Quantcast
Channel: Tip of the Day – Cadimage Blog
Viewing all 1008 articles
Browse latest View live

Create Continuous Contours

$
0
0

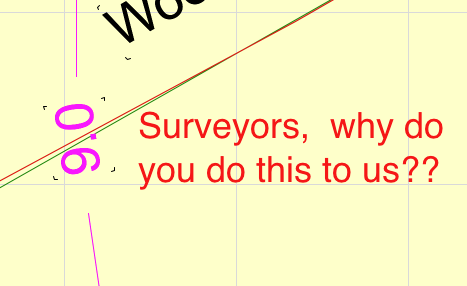
I’m sure we’ve all had surveyors send us wonderful topographical plans with contour height labels in the middle!
The frustrating thing about his obviously being that you can’t just simply magic wand on the contour line and get 1 continuous spline or polyline.

Screen Shot 2013-06-04 at 11.55.28 AM

Fortunately the good folks at Graphisoft have understood this frustration and given us a wonderful way to overcome this situation

Simply magic wand both section s of the spline created by the surveyor, then manually join them together by stretching one point to the other.

Select both Splines and go to Edit>Reshape>Unify…  ArchiCAD will join the 2 splines into 1 piece

Making a Zone Legend

$
0
0

If you are using zones and wanting to make a Zone Legend, you will find that the colors for the the zones are not available from the standard pen sets.

To get around this, simply place and additional zone with the correct color.  We can not leave this Zone as it is, as this will affect our lists, schedules and other calculations.
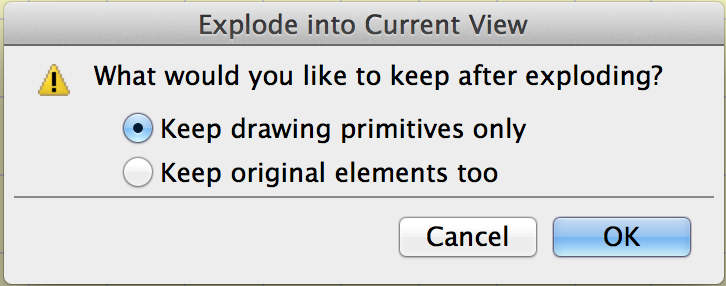
Select the Zone and go to Edit>Reshape>Explode into Current View…
From the next dialog box select the option to Keep Drawing Primitives only , then press OK

Screen Shot 2013-06-04 at 1.50.38 PM


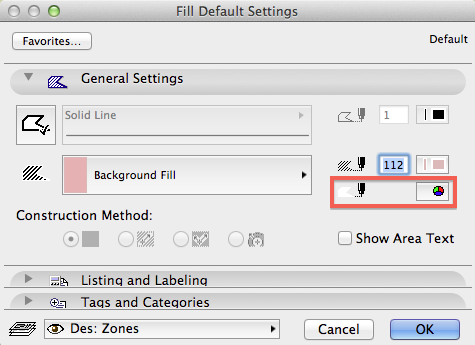
The zone area will now be displayed as a standard fill.  You can Alt/Option click on the fill to pick up the properties of the fill.

Screen Shot 2013-06-04 at 1.53.31 PM

You will notice that the background pen color is being displayed as a three colored wheel.  This means that it is not a color you can choose as it is an RGB color

Setting up a nudge

$
0
0

A quick way to move elements on the screen is to nudge them.

Select one or more placed elements, and then while holding down your Shift key, simply use your arrow keys (Left/Right/Up/Down) to move the object in the chosen direction.

The distance the object/s move is set in the Girds & Backgrounds dialog box (View>Grid & Editing Plane Options>Grids & Backgrounds…)

Screen Shot 2013-06-04 at 2.01.39 PM


To move the elements using the ‘Big’ nudge settings select the objects and then press Shift + Alt + Arrow Key


Aligning a texture

$
0
0

In some situation you may want to align a material to certain point.

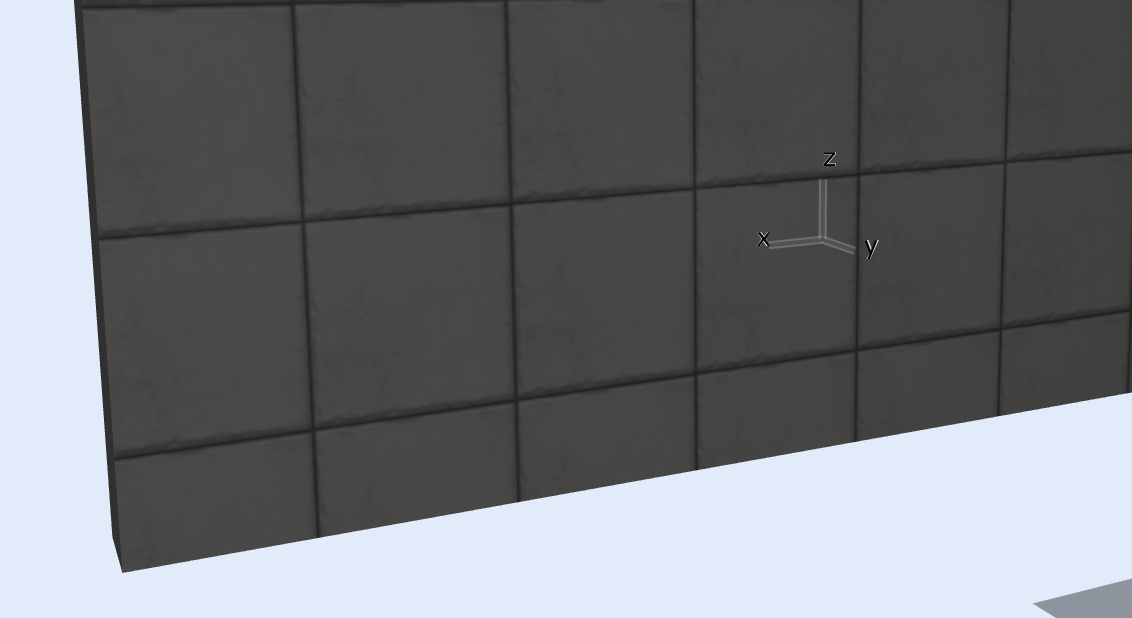
In the example below, you will note that the tiles seem to be setting out from some random position

Screen Shot 2013-06-04 at 2.21.13 PM


In order to fix this, simply select the object ( In this case a wall) and got to Design>Align 3D Texture>Set Origin…
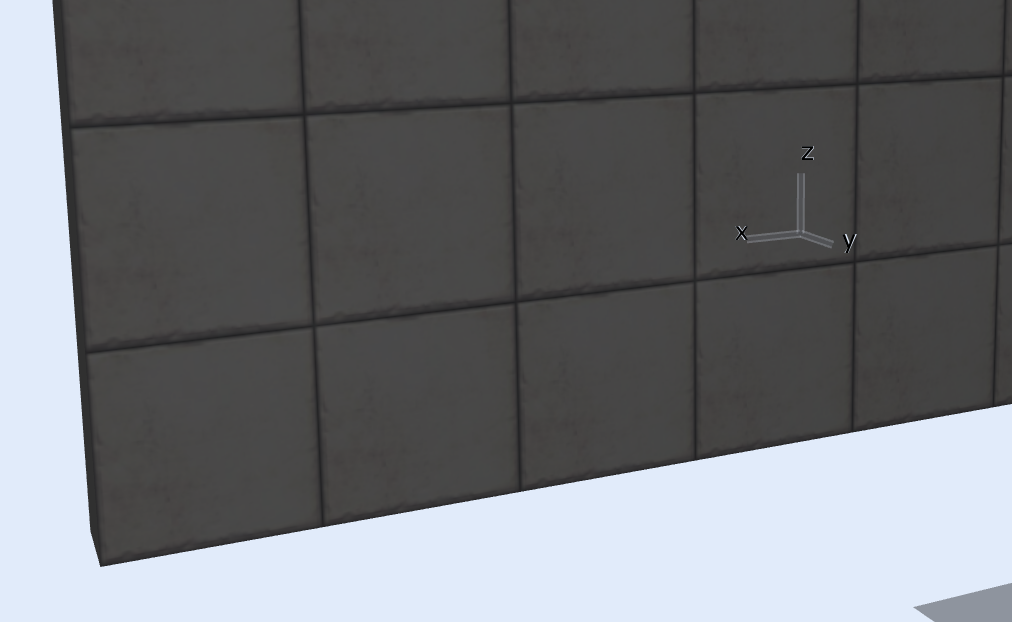
then select the origin point for the texture, In my example the bottom left hand corner.

Screen Shot 2013-06-04 at 2.23.48 PM


You will notice now the tiles are setting out from the correct location

This process can be used for aligning things such as exterior paving, floor and walls tiles, vertical/horizontal weatherboards etc.

New user or needing a refresher course

$
0
0

No matter which category you fit into there is a very good chance that by using the Graphisoft Interactive Training Guides (ITG’s) you will pick up some good tips.

A quick summary of these are as follows

Experience BIM (Building Information Modelling)
Using the Frank Lloyd Wright designed Massaro House, this provides a conceptual overview of BIM

ArhiCAD Essentials
Designing and Documenting an office building from scratch, this provides an in-depth insight into the functions and working methods of a BIM application

Advanced Modelling
An introductory guide to advanced modelling techniques for creating complex forms and structures

Advanced Collaboration
An overview of workflows for project sharing and strategies for team working

Building Object Creation
An Introduction to GDL object creation methods and techniques

So no matter where you sit in the ArchiCAD Spectrum there is bound to be something there for you.  All of the training guides can be downloaded from here

32 bit reminder

$
0
0

Now that ArchiCAD 17 is being released it worth reminding you that this will only work on current 64 bit operating systems.

This means that all 32-bit machines will not be able to run ArchiCAD 17

Some operating systems like Windows XP are no longer officially supported as ArchiCAD continues to keep up with modern operating systems.

You can see the full list of system requirements for ArchiCAD 17 here:

http://www.graphisoft.com/support/archicad/system_requirements/

Online Certification and job postings

$
0
0

If you are wanting to advertise your skills to potential viewers as a BIM Genius or ArchiCAD whizz, why not look at getting online certification?

Graphisoft have an online test that anyone can take

Visit the Certification site here, It is a simple multiple choice question that will give a percentage rating at the end.

“A knowledge of ArchiCAD is an increasingly valuable asset in today’s world. Companies are competing for the services of well-trained ArchiCAD users. We believe that the number of expert ArchiCAD users runs into the several thousands. In many cases, however, even these experts themselves do not realize their true abilities – abilities which are currently very much in demand. GRAPHISOFT’s certification program gives users the opportunity to measure their Archicad knowledge against a global standard, to further develop their skills and to improve their chances of finding ArchiCAD jobs around the world”

What is the purpose of your walls?

$
0
0

Most of the time the walls we place are designed to do more than just separate rooms from each other hold windows.
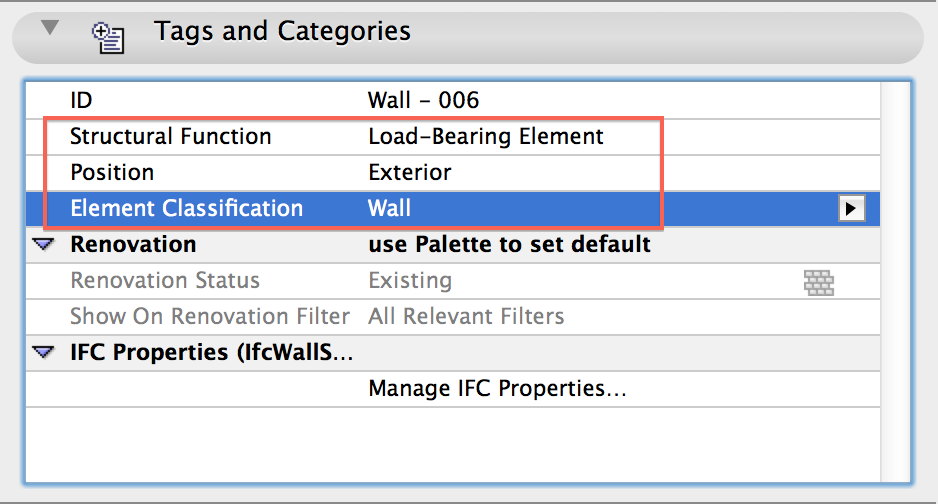
Some walls are Load Bearing, some aren’t, Some define the Exterior walls, some the interiors.

Why not tell ArchiCAD what those walls are?  That way the next person to look at your file can also tell which walls are load bearing etc.

You can find some basic settings in the Tags & Categories tab of the wall Settings Dialog box

Screen Shot 2013-06-07 at 2.09.25 PM


If you get into the habit of assigning these functions to things such as slabs, walls, stairs, roofs etc,  If you ever need to export your file to IFC to be run through some form of BIM verification software such as Solibri Model Checker, the bulk of your IFC settings are already done!


Zones in rooms with internal walls

$
0
0

In the Example below I am wanting to place a zone that covers the entire Bathroom area.  If I simply click inside the bathroom the Zone tool will stop at the Glass walls I have placed to create my shower enclosure.


Screen Shot 2013-06-07 at 3.01.17 PM


I could place the zone and then manually modify the shape to suit.  However if I do this, The next time I use the Update Zones command (Design>Update Zones…) the same thing will happen.
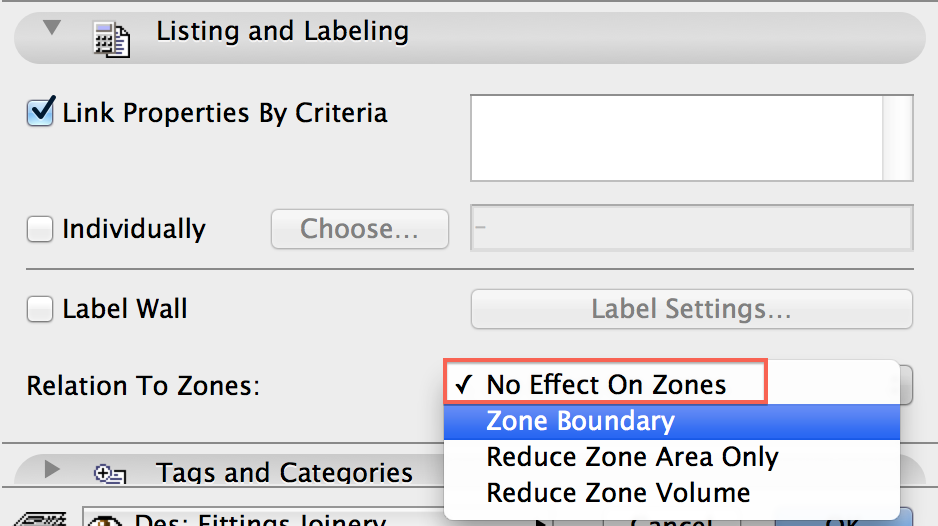
In order to get this to work correctly I have to tell these walls that they do not affect the Zone

To do this select the Walls in question and open their settings and go to the Listing and Labelling settings.
All I need to do now is change the “Relation To Zones” option to show “No Effect On Zones” as per image below

Screen Shot 2013-06-07 at 3.01.25 PM

Model like you would build

$
0
0

For framed buildings like those in New Zealand it may be useful to model how you expect the building to be built.

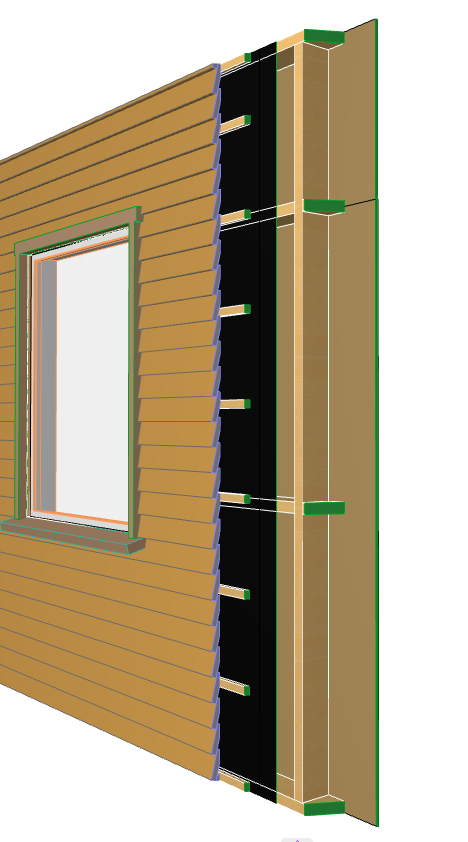
Taking your building to the next step could be actually adding the Wall Frames using the Cadimage Wall Frames tool like this:

NZ Wall Frame


This has been created using the Cadimage Wall Frame tool & the Cadimage Coverings tool for the exterior cladding.

All from a simple composite wall we now have the interior cladding, wall frames, waterproof membrane, battens & a profiles exterior cladding!

With some setting up I can now use these settings using presets & roll them across my building to use in my other projects with ease.

Find out more about the Wall Frame tool here: http://www.cadimage.com/Products/Tools/Wall-Frames

And find out more about the Coverings tool here: http://www.cadimage.com/Products/Tools/Coverings

Referencing Consultants drawings

$
0
0

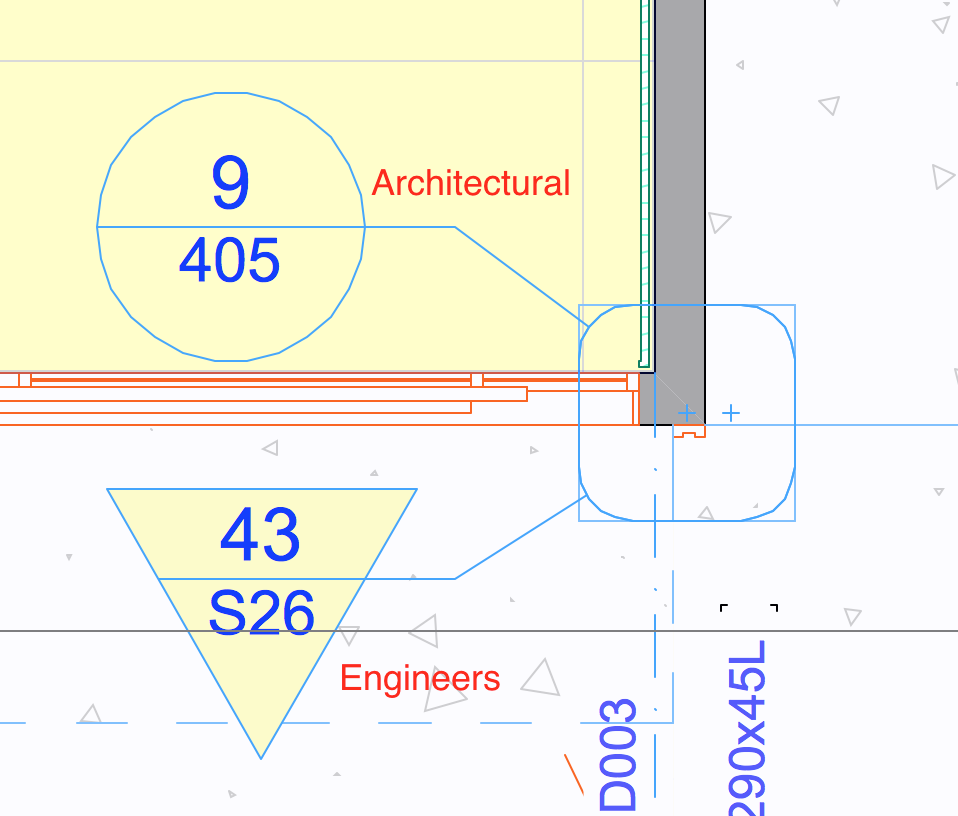
Do you have situations where you might want to reference the same point of a building to both an Architectural detail drawn in ArhiCAD and a consultants drawings authored in another software package?

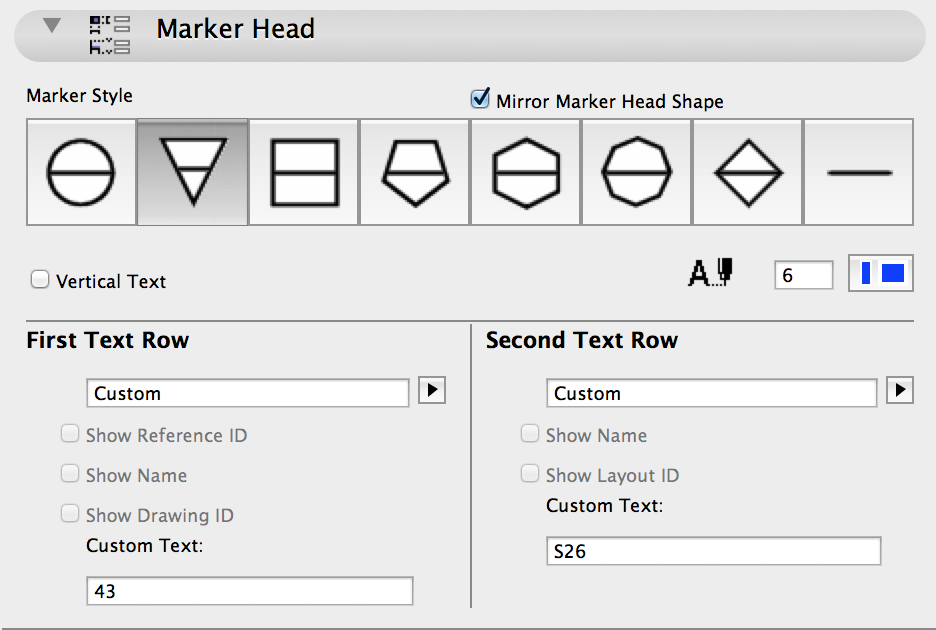
Simply create your standard detail markers for your Architectural drawings, and then create an independent detail for the engineers details.  The trick to telling them apart is to simply change the marker head.

Screen Shot 2013-06-07 at 2.52.45 PM


There are plenty of markers that you can choose from.  On larger projects you could assign marker head shapes to different disciplines.
I.E. Round = Arch, Square = Struc, Triangle = Hydraulic, Pentagon =Electrical etc.

As you can see there are plenty to choose from

Screen Shot 2013-06-07 at 2.53.00 PM

Use 3D Text to “Stamp” A wall

$
0
0

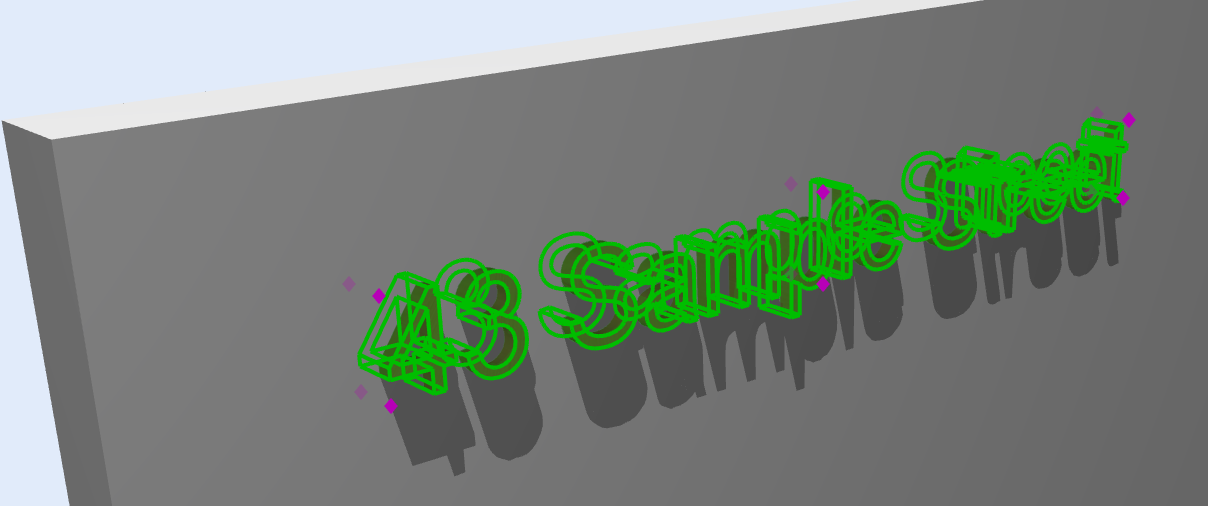
In the example below I am going to use the 3D text object to create a negative stamp into my wall. The stamp is going to represent the address being stamped into the boundary wall.

First create your wall, place your 3D text object, (Which is found in the ArchiCAD Library>Object Library>Basic Library>Furnishing>Decoration folder)

Set it so that the object overlaps the wall by approx 50mm.

Screen Shot 2013-06-07 at 3.32.09 PM


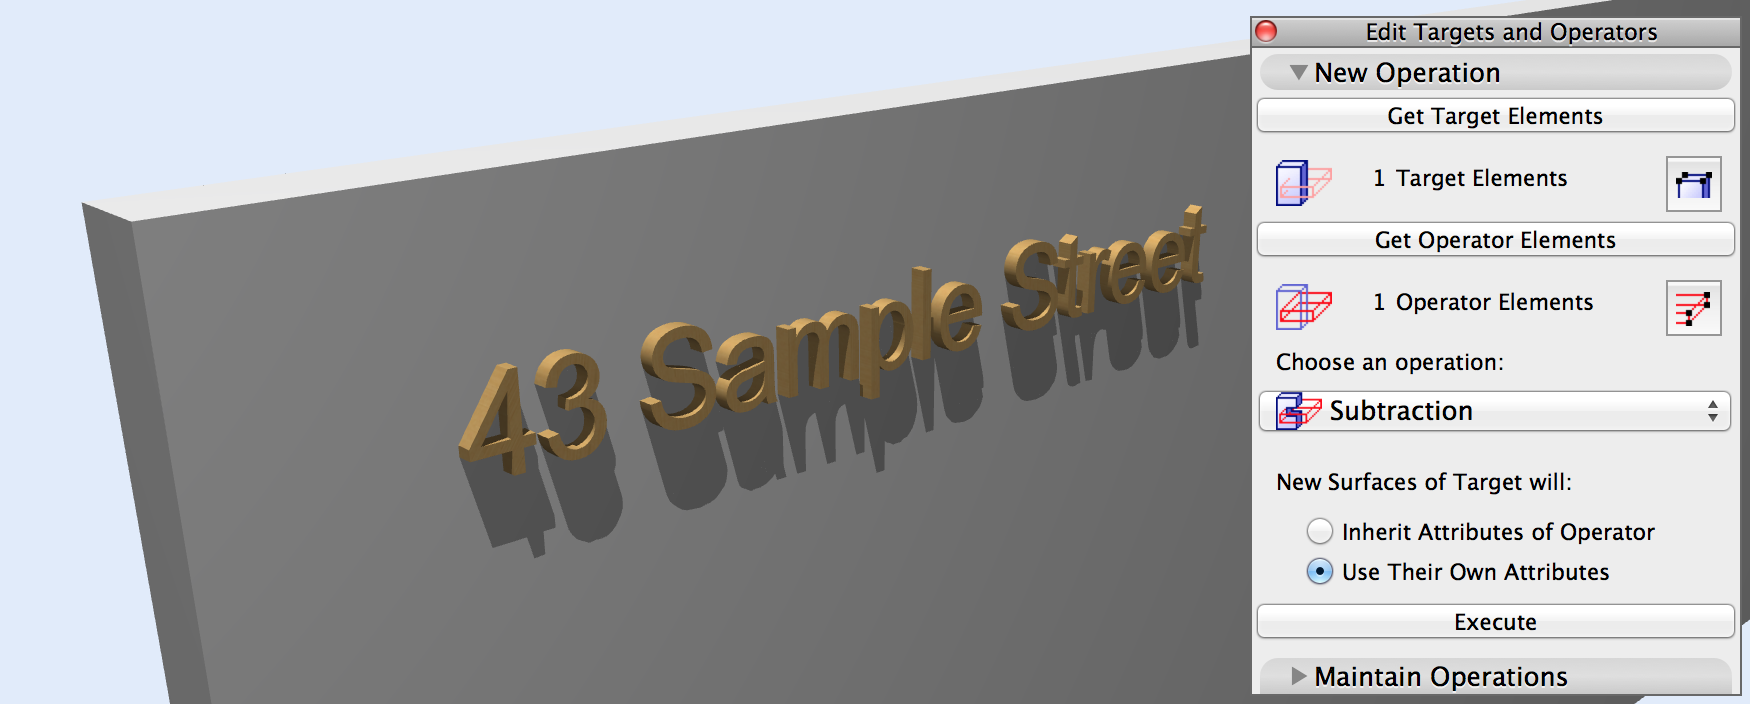
Once this is in the correct location open the Solid Element Operations tool from the design menu.

In this case the wall is selected as the target, the 3D text as the operator and the operation is going to be a straight forward extraction

Screen Shot 2013-06-07 at 3.33.42 PM

Once you have pressed “Execute” select the 3D text and assign it to a hidden layer.

Screen Shot 2013-06-07 at 3.36.25 PM


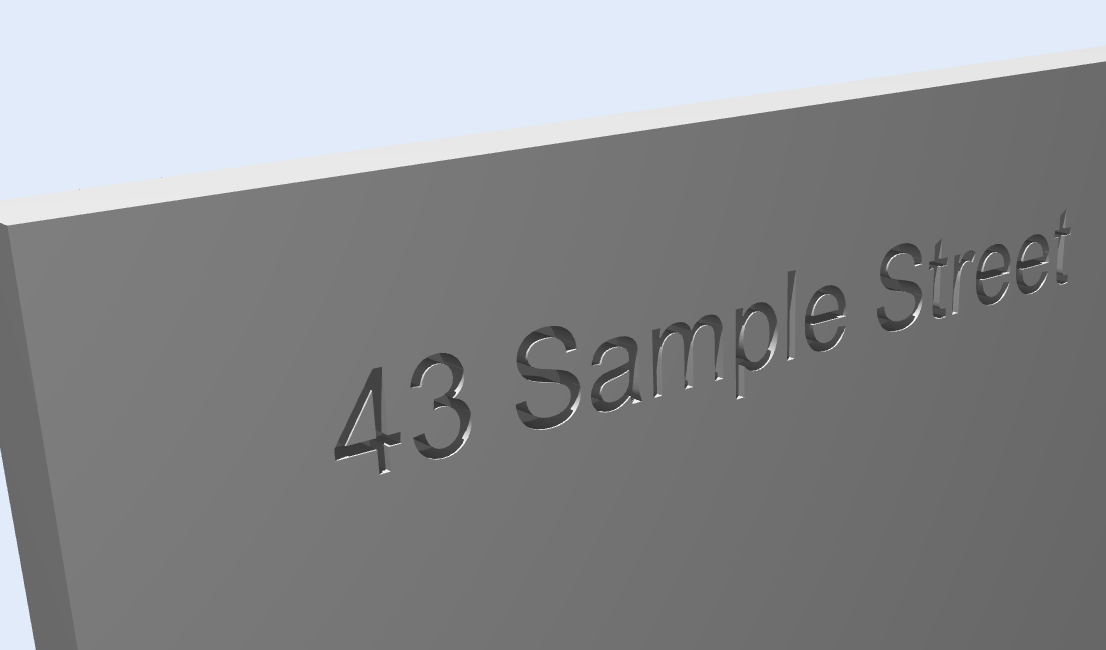
The result shows the outline of the text carved into our block wall


Create a Finial with Extrusions.

$
0
0

If you need to create a finial for  a roof you may use Extrusions:

1. Save the finial half cut drawing as a preset. Here is a link to another quick tip about Custom Profiles:

http://wp.me/p2VWtV-2K0

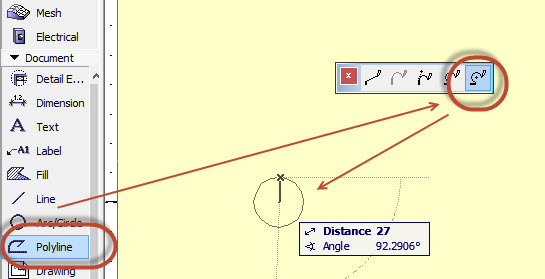
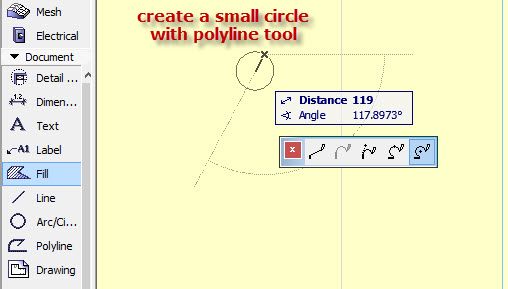
2. Create a small circle with the Polyline tool.

17-06-2013 12-17-28 p-m-circle


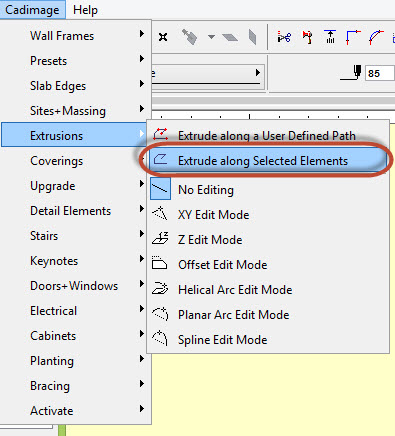
3. Select the circle and go to Cadimage> Extrusions> Extrude along selected element.

17-06-2013 12-22-15 p-m-extr.


4. Search the saved preset profile. Settings> Shape> Profile> Custom> Select the profile and click OK.

6-06-2013 2-14-18 p-m-LATHED OBJECT 02


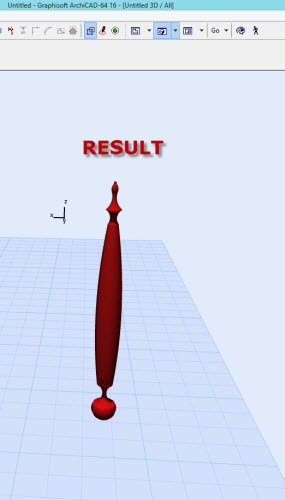
5. The resulting object will be a finial profile extruded along a small circle.

6-06-2013 2-14-18 p-m-LATHED OBJECT 05

What Elements can not have a renovation status

$
0
0

For those who are still getting used to the ArchiCAD renovation tool, it can be extremely useful for renovation projects where you can show the project in different stages of construction with the help of the renovation filters. There however is a few elements that can not have a renovation status and therefore do not get affected by the renovation filters. It is a simple test by placing everything & changing the filter you can see some elements remain:

renotest


In summary, the following elements can not have a renovation status:

  • Drawing
  • Section
  • Elevation
  • Interior Elevation
  • Worksheet
  • Detail
  • Figure
  • Camera

The reason for this is elements like Section, Elevation & Details are in the same location regardless of the renovation filter, you can also have 2 sections using the same section line & changing the renovation filter setting.

Cameras are hidden by which path you currently shown & Figures/Drawings are external files so remain in the file wherever youve placed them & need controlled via layers

Partial Structure Display

$
0
0

partial-structure

When using Composite Structures you can set the composite Component Types (Finish, Core or Other) then use Partial Structure Display to turn off portions to more clearly represent your model.  Document > Partial Structure Display.


Easy reference for all the ArchiCAD toolbars

$
0
0

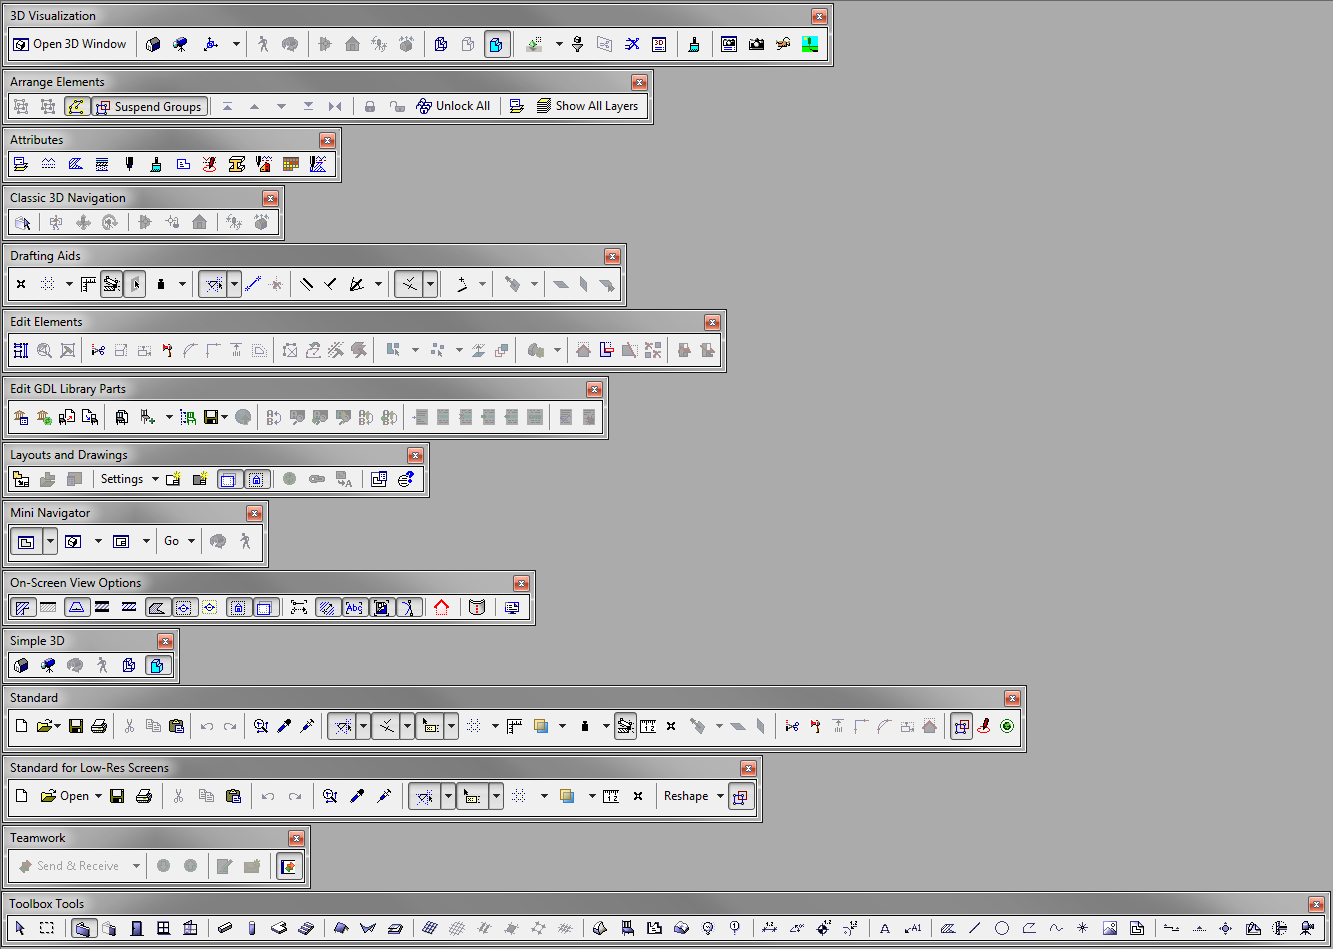
Remember that toolbar you used in the past that was really useful? Cant remember the name?
It happens to the best of us & we often find ourselves opening each toolbar till we find the one we require

So heres a quick image of all the standard ArchiCAD toolbars you can use a reference in the future

The image is a little large so you can view it fully here: http://blog.cadimage.com/wp-content/uploads/2013/06/Toolbars.png
One very useful one for future referencing toolbars which may help you complete work quicker.

Toolbars

Setting out your beams

$
0
0

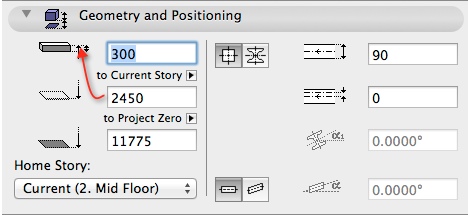
When placing beams the first height you are asked for is the thickness of the beam.  This thickness is always measured from the top surface downwards.

This surface is also important when considering your set out as this surface is the one used to measure the height from the floor level

2013-07-08_09-17-58

ArchiCAD always measures the setout to the top surface first and then sets the thickness of the beam down


Create A Wall Framing Plan

$
0
0

As with everything in ArchiCAD, walls have the ability to to have a unique identification label

2013-07-08_09-27-04

once we have checked that all the walls have unique ID’s, we can use the label tool to label each wall, effectively creating a wall set out plan for our builders.


Finishing off your walls

$
0
0

In the situation below I have a timber framed wall that has been finished without a door or another wall to wrap against.

image 1

As you can see the result is an uncovered wall core.  Obviously this is not the type of finish I want my contractor to leave on site
In order to finish these walls off properly, I am going to use the Wall End tool, which can be found in the More section of your toolbox.

image 2


In the tool settings, I am going to choose to use Wrapped End option.  I need to set the values for options 1,2 & 3 to match the thickness of my plasterboard finish.  These values have been set in the chosen composite.

image 3


Once I have set this up, I can simply click on the end of wall to place the object and see the result

image 4

image 5

Make your Teamwork messages more visible

$
0
0

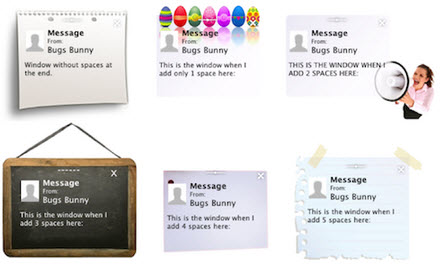
Adding different numbers of spaces to the end of a Teamwork message results in different looking pop-up windows for your addressee.

ArchiCAD messages are a bit subtle by default so this may help make them that bit more obvious to get your requests approved quicker.

Teamwork messages

This is part of the ArchiCAD Easter Eggs which you can read up more about here: http://www.archicadwiki.com/EasterEggs

Viewing all 1008 articles
Browse latest View live