Quantcast
Channel: Tip of the Day – Cadimage Blog
Viewing all 1008 articles
Browse latest View live

Trying to work out roof framing? Try using the wizard

$
0
0

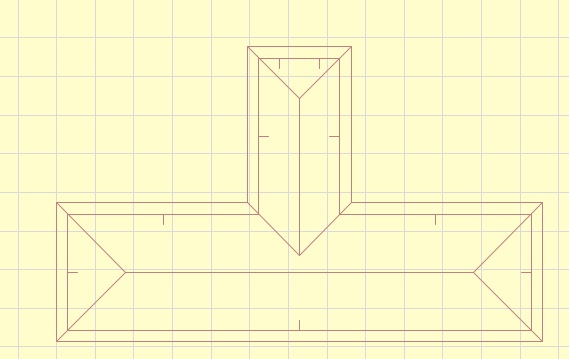
In the example below I have a very basic roof plan which I need to setout my roof framing plan on.  I could very simply go through and show my intended framing with some basic 2D lifework, however, if I am interested in maintaining my 3D model, then there is another way to go.

RW6

Select the roof, then from the Design menu, choose the Roof Extras > Roof Maker > Roof Wizard… option.

In the following dialog boxes, I can setup the structure of the roof, including thickness and spacing of Rafters, Ridge Beams, Eaves Purlins, Ridge Purlins, Trimming Rafter, Collar Ties and Bottom Chords.

RW1


RW2


RW3


RW4


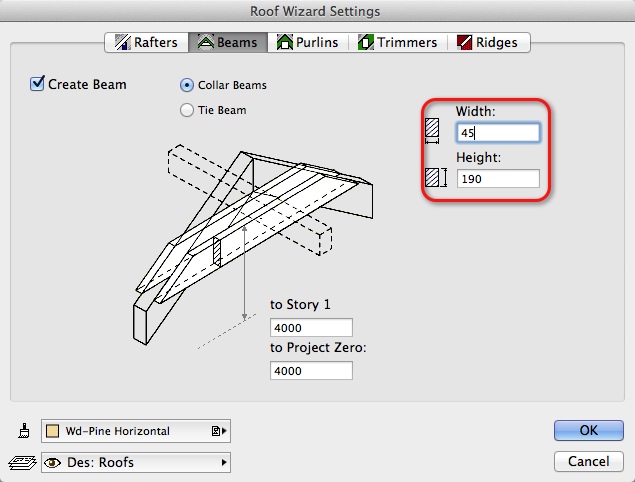
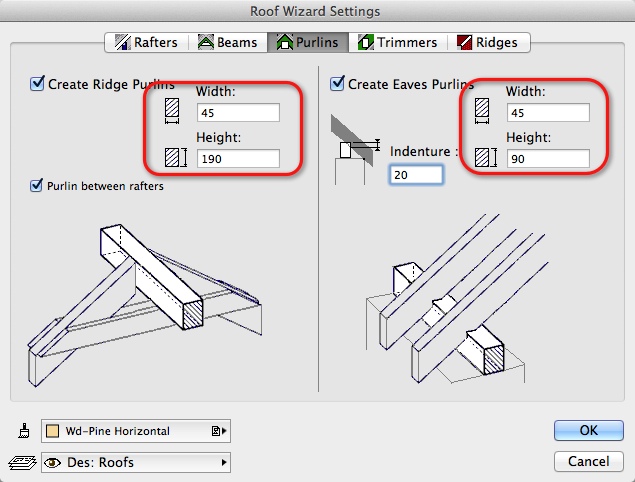
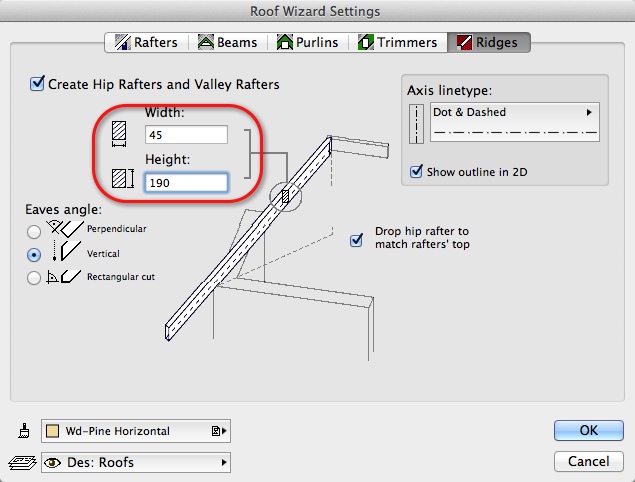
Once I have finished calibrating all of my settings, simply Hit the OK button and ArchiCAD will generate a roof framing plan for you.  All of the roof framing members are parametric 3D objects.  Meaning that you can then list and schedule out all of your roof framing accurately.
If the framing isn’t in the right place, you can then simply start to manually manipulate the members into the correct positions.

(Note: I normally then change the thickness of my roof slab to 1mm thick and raise it up so that it sits over the framing members, and shows as my roofing underlay in section)


Opening a second instance of ArchiCAD on a Mac

$
0
0

If you are like me and are a Mac user, (Awesome),  opening a multiple instances of ArchiCAD is not as simple as just clicking on a file and saying open.

First we need to have ArchiCAD running, then got to either File > Open… or File > New…

In both of these options there is a checkbox that we need to tick in order to open another session of ArchiCAD.

open 1

open 2

Turn off Zone background colour

$
0
0

If you are using Zones for your Room Data, you can turn off the zone colour by going to Document > Set Model View > Model View Options, then within Override Fill Display tick Override Zone Fills and choose to No Fill.

Adding an accurate location

$
0
0

If your project requires Sun Studies for consenting purposes or if you are wanting to do a sun study for evaluation purposes, it makes sense to get the geographical location as correct as possible.  We can do this by going to the 3D View Options > 3D Projection Settings… option from the View Menu.

In the dialog box that appears click on More Sun… button

AL4
In the next dialog box click on the Project Location Button

AL3
In the next dialog box that pops up, you can enter in the GPS co-ordinates either based on North, South, East or West.

AL2
If you don’t have these numbers off the top of your head, try going to Google Earth, which is free, Zoom in to the property in question and you will see displayed at the bottom of the screen the co-ordinates.
AL1


Grid Display and the Editing Plane

$
0
0

One of the questions I get asked frequently while training people and on the support desk is how to turn off the Editing Plane and how to change the Grid display.  These are both quite simple things to rectify. To turn off the Editing Plane display, go to the View Menu and simply click on the Editing Plane Display option

Edit 1


If you want to change the color of the grid, first make sure you are in 3D window, then go to the View menu and this time choose the Grid & Editing Plane Options > Grids & Backgrounds… option.  In this dialog box you change the sizing and colour of the grids as well as the background colour.

edit 3

Missed the Tip

$
0
0

If you didn’t get a chance to read the Tip of the Day when it popped up in the morning, you can get it back.

Select Activate > Tip of then Day from the Cadimage menu.

Screen Shot 2013-07-18 at 9.20.01 AM

Then click the Show Now button.

There is also a check box to stop the Tip of the Day appearing each morning, but surely you wouldn’t want to check this.

Create a drop shaped window.

$
0
0

Cadimage Windows flexibility allows you to create Drop shaped windows.


Just select in the Setout options the ‘Head shape’ to be  a “Gothic Arch’ and the ‘Sill shape’ to be an ‘Elliptic Arch’

You can change the  shape of the drop/window in Elevation or Section with the interactive nodes.

30-07-2013 10-53-37 a-m-DROP-1


30-07-2013 10-54-26 a-m-DROP-2


30-07-2013 10-54-57 a-m-DROP-3

Edit Keynotes On the Fly…

$
0
0

With ArchiCAD 17 we have introduced a new Palette for Keynotes, the Edit Keynote Palette.

To activate it select Keynotes > Edit Keynote Palette from the Cadimage Menu.

It works in combination with the Keynotes Palette, if you select a Keynote in the Keynotes Palette, the Edit Keynote Palette will be populated with the selected Keynote information.

KN TOD Edit Palette

You can use this to check the entire contents of the selected Keynote, or you can adjust it and either Update the selected Keynote by clicking the Update button (1), or Add a new Keynote by clicking the Add button (2).

When you have completed making changes to the keynotes click the Update Keynote Labels button (3) to update any labels which have already been placed.


Tip of the day ideas?

$
0
0

You may have noticed tip of the day have been pretty minimal lately.

The truth is we are running out of ideas! After producing tips for years on all the little features that you may not have known about we are running out of ideas on new tips which do not repeat one we have published earlier of which there is hundreds!

If you have any tips you would like to share with us which could help others please just respond to this or send an email to support@cadimagegroup.com and we will get working on another well documented tip to help all our customers out there :)

Afterhours help

$
0
0

If you are like me and find that the best time of the day to get productive work done is once everyone else is in bed, you might have a situation where you need help, As much as I like working late too, our support center is not open 24 hours (occasionally they let us go home!)

The ArchiCAD community is a global workforce and there is a good chance that some one on the other side of the world who is awake has encountered your problem before, so if you find yourself in a situation where you need some help at 3AM, there are a multitude of places where you can find help about ArchiCAD.

Try these to start with:

http://www.archicadwiki.com/FrontPage

http://www.graphisoft.com/support/

http://archicad-talk.graphisoft.com

http://www.youtube.com/user/Archicad

Failing that of course, you could always try simply typing your question into Google!

Keynotes Search Function

$
0
0

Keynotes for ArchiCAD 17 allows you to search for a word or phrase.

Bring up the Keynotes palette using the Cadimage > Keynotes > Keynotes Palette menu.

Screen Shot 2013-08-05 at 8.48.05 AM

Type the word or phrase you want to find into the search field (1) and your list of keynotes will only contain notes with that word or phrase.

It can show Keynotes for just the selected Category or you can select All Categories (2), to search the whole keynotes database.

Click the x button (3) to cancel the search or just type a different word or phrase to do another search.

Are you sick of filling in the same forms

$
0
0

Do you have forms that you need to fill in on every job?  The one that springs to mind for me is the Building consent Application files.

Heres a simple tip to help you.  Download the PDF copy of your forms and place them onto a layout, This means the form is already there and ready to be printed as a part of your documentation set.

In this case I have the Auckland Council Building Consent page

Screen Shot 2013-08-02 at 12.01.29 PM


You may also notice that I have added Autotext fields to this form.  This of course means that the information I add for my Title blocks will now show up on the application form as well.


Do you draw a lot of repetitive details?

$
0
0

Do you find that you are constantly drawing the same details?  Ok so they might not be exactly the same but are close enough.  Why not make a module file of the detail so that you can take some of the repetitiveness out of the job.  It is a really simple process.

Firstly draw the detail up the way you want it to appear and then select all the elements:Screen Shot 2013-08-05 at 9.59.46 AM


In this example I have used a standard roof to wall junction.

Once you have selected everything, simply copy all of the elements by either using the right click context menu or by using the Edit>Copy… menu command.

Once the elements have been copied, simply go to File>Save As… In the Format type make sure you choose the Module File From Clipboard option.

Screen Shot 2013-08-05 at 10.04.24 AM
Give your module a name that you can remember and save it into a folder somewhere
Tip:

If you are replicating details that appear in either codes or standards, create a folder with the name of the standard and save the detail with the same figure number as in the standard.  That way once you’ve looked up the detail in the appropriate code or standard you will know where to look in your library of details!


Framed opening

$
0
0

You may be aware of the ‘Empty opening’ option in ArchiCAD, however sometimes you may require a frame or jamb to be applied to this opening.

With the Cadimage window we have taken this into consideration and within the list of Panel Types there is an option for ‘Open’

Framedopening

The means you can control Frame, Trims and appearance of this opening much more than the ‘Empty Opening’

Change the Doors+Windows Schedule Margin colours.

$
0
0

You can change the colour of the pen of the margin in your D+W Schedule.

1. Select the margin

2. Open the settings.

3. Go to the Fills and Pens section of the Parameters and change them.

SCHW01


Note: Don’t try to delete the margin, it’s part of the schedule functionality. If you don’t want to see the margin, change the pen to be transparent.


Get your stories straight

$
0
0

We quite often see using stories in place of layer combinations.  While this system does work in some respects, It is not an ideal way to work.
With the use of layer combinations there is no need to create additional stories.
Below is a very basic schematic diagram of how I would normally setout my layers and stories.

2013-08-06_15-46-01


As you can see, using my layer i can have different forms of framing on the same stories.  In this situation, anything that resides below the top of my slab , or the u/side of my flooring, goes onto my foundation layers and the mid floor framing goes on my framing layers.  This way I can turn on my floor framing and ensure that my floor beams relate correctly to the supporting wall structures under them

Emphasise what is important

$
0
0

Generally when we are creating renderings what we are trying to create is the concept of the design.  And lets face it, most of our clients when presented with a design will make comments about the colour schemes or the type of furniture.  I have found that a good way of dealing with this is to model the building almost entirely in a white color.  This way they look at the building as a whole form and don’t focus on the wrong things at the design stage.

If I need to model contextual information I model the elements in a semi transparent white colour.

gallagher


The image above was a very quick render which clearly shows the context of the building to the site and additional things like vehicles and planting being shown indicative  by nature of the transparency.  This also works well with furniture internally to show possible furniture layouts


How to quickly morph a Bullnose Verandah

$
0
0

A Bullnose Verandah is one of the more complex elements you may want to model in a house

We can no longer use the roof tool since it doesnt allow curves.

And the Shell tool may be overly complex & wont give any profile to the roof.

My suggested solution to a customer recently was to draw a normal single plane roof (with Perpendicular edges) & apply a covering (turning Framing off so they touch)

DontIncludeFraming

You can then select both the Roof and the Covering and right click to choose ‘Convert Selection to Morph’

Convert To Morph


A really useful thing to do now is to join then, to do this select both and right click and choose Boolean Operations>Union

BooleanUnion

Then in 3D select a point and use the Tube option to start extruding the roof:

Morph Tube

Now pick the edge of the roof as the reference plane using this tool:

Pick reference plane

You can then choose a tangent curve (Chord) method to get the finishing curve to the roof:

Bullnose turn

Now simply using Split and Mirror a copy and now your left with a well modeled bullnose verandah roof with minimal effort.

Bullnose Verandah2


Add some light to your images

$
0
0

When doing internal renderings, try to remember that sunlight travels in through windows and reflects off surfaces.  To emulate this effect simply place in some window lamps.  These objects can be found in the Lightworks folder in the Lamp default settings dialog box:

2013-08-06_17-07-50

Simply place the object to the inside face of the window with the dome facing in, then size and position it to cover the window.

The results can be seen below:

2013-08-06_17-13-57


Without window lights

2013-08-06_17-13-37

With window lights

Transferring pens from one pen set to the other

$
0
0

We all have our issues with pen sets, they have changed quite a bit from the early days of ArchiCAD

Some office templates still use the pens set out in rows like version 9:

ArchiCAD 9 penset

While ArchiCAD’s standard pen set has looked like this for several years now:

ArchiCAD 17 pen set

If you are using the old style you could find yourself constantly changing the pens when placing objects or construction elements.

We obviously recommend that the best practice is to use the standard pen set as much as possible and do some minor modifications to it and your workflow will be a lot easier. That being said you may have set out pens and want those as well in the ArchiCAD pen set.

Rather than having to rearrange the pen set or manually create your pens again you could transfer them using the attribute manager

Go to your pen set and Append whatever pens you would like to use again, then they will be stored in the ‘Pencil Box’

Append pen

You can then change over to a standard pen set and Overwrite the pen in that pen set with the one you had already made

Overwrite pen


By overwriting it ensures that it is still using the same pen number and it also means none of your element will change pen colour if they used that pen in the original pen set.

Viewing all 1008 articles
Browse latest View live