Quantcast
Channel: Tip of the Day – Cadimage Blog
Viewing all 1008 articles
Browse latest View live

How to create a channel drain linetype

$
0
0

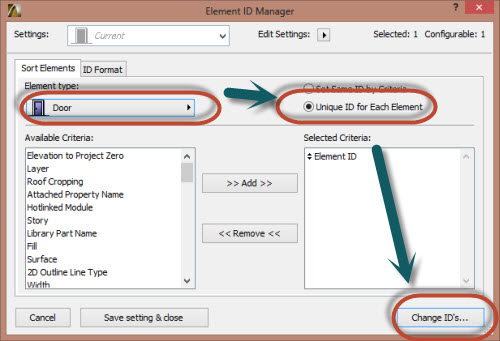
I used to get very frustrated having to use fills and lines to show simple things like channel drains. So I came up with a linetype of my own that would look rightish and this is how I did it.

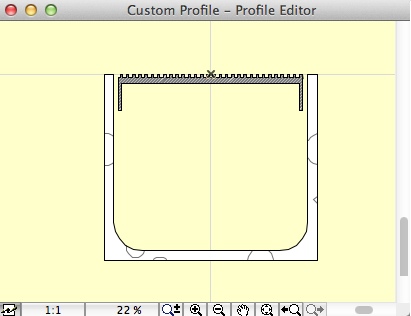
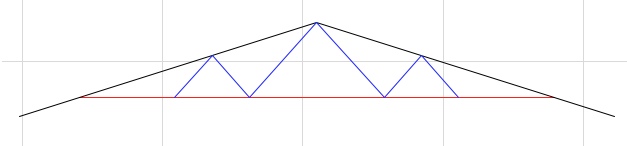
I started by drawing some basic straight lines to show the shape I wanted

Screen Shot 2013-08-06 at 5.20.33 PM

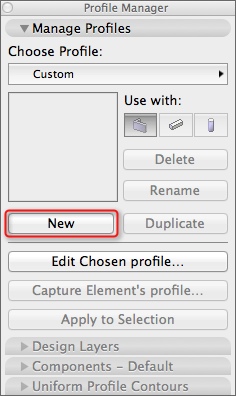
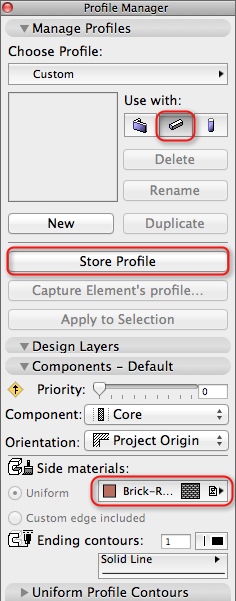
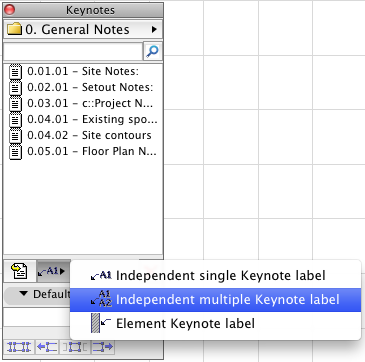
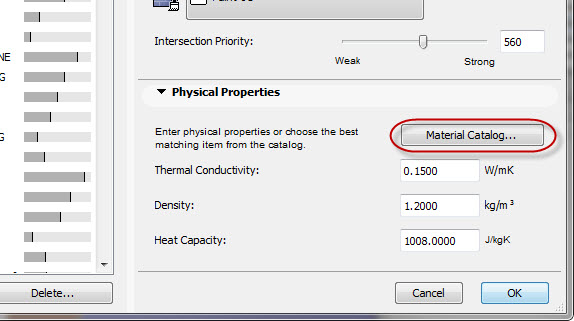
Once you have the shape right, select all of the elements and copy them (Either Right click copy or Edit>Copy…)  Then go to Options>Elements>Line Type… and choose the New option
2013-08-06_17-21-03
In the box that pops up give your linetype a name, then make sure you choose the Symbol option and press OK

2013-08-06_17-21-23

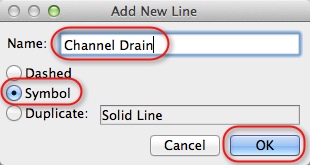
After this click on the Paste Line Components button.  Mine came in with the dash measuring 40mm and the gap at 10mm, As you can see I changed this to a dash of 6mm and a gap of 0. At the top of the dialog box you can see the resultant line type

2013-08-06_17-22-19

have a play with the settings and see what sort of different line types you can come up with


Create a channel drain profile

$
0
0

Yesterday I showed you how to create a linetype to indicate a channel drain. Today I am going to model up a channel drain.
Start off opening the Complex Profile Manager Design>Complex Profiles>Profile manager…

2013-08-07_08-41-50
choose the New option, then in the Profile Editor Draw the shape of your channel drain

2013-08-07_08-42-39
Once you have drawn out the shape you like, Make sure that you choose the Beam option under Use with:, change the material, and then click on the Store Profile button.

2013-08-07_08-43-08

You can now assign the channel drain profile to a beam in your model.
Use the Solid Element Operations tool setting the slab as the Target, the channel drain as the operator and the operation to Subtraction with Upwards Extrusion and you end with something like this:

2013-08-07_09-08-25


New Multiple Keynote Label option

$
0
0

The Keynotes palette now includes an Independent Multiple Keynote Label option as well as Independent Single Keynote Label and Element keynote Label, which you had previously.

Screen Shot 2013-08-08 at 3.16.33 PM

This option allows you to add multiple Keynotes to the Keynote Label right from the palette.

You could do this in the past but the additional Keynotes needed to be added through the Label Settings Dialog.

You can also update Keynote Labels that are already placed by selecting the Keynote label(s) and then double clicking on the Keynotes to add them or clicking on the Delete button to remove them.

Screen Shot 2013-08-08 at 3.18.26 PM

Looking for a change of scene?

$
0
0

If you are looking to employ a new staff member, or looking for a new job remember that we host a job board on our home website

http://graphisoft.co.nz/community/jobs/

If you are looking to move abroad, then perhaps try going to the international job board  at

http://www.graphisoft.com/users/job_board/positions_available/

How to duplicate a Building Material

$
0
0

As I go further into Energy Evaluation it soon becomes apparent that some building materials are missing.

This means creating completely new ones. To do this go to Options>Element Attributes>Building Materials.

Although there is no ‘Duplicate’ button like other attributes you can still perform this

Select the material you want to duplicate first then click New:

Duplicatematerial

You can then change the name to be more what you need

There will be two options ‘New’ and ‘Duplicate’

New will be a clean slate where you have to set up fills, pens & thermal properties

If you keep the Duplicate option selected it will carry all this through & you just have to edit the appropriate settings.


Assign a number to windows in ArchiCAD 17.

$
0
0

Sometimes you will want to have a specific order ID for your doors or windows.

We know you can change the ID individually, but if you use the Automatic ID numbering sometimes the numbers are not assigned in the order we would want.

There is a work around:


  1. Select all your Doors, change the ID to  ‘0’.
  2. Then select the doors in the order you want to assign.
  3. Go to Document> Schedules and lists> Element ID manager.
  4. Select Doors as Element Type and Unique ID for Each Element.
  5. Click in Change ID’S

TIP 0F01


TIP-0F02

What is IFC?

$
0
0

A lot of people ask us this question and the simplest explanation is, IFC (Industry Foundation Classes) is a universal framework that allows different software packages to transfer information between each other with minimal data loss.

So what does this mean?

The traditional example would be an Architect using ArchiCAD collaborating with an Engineer who uses Revit Structure.
The typical workflow in this situation is for the Architect to output floor plans, sections, elevations etc. in DXF or DWG format.
The engineer then has to work on the project with 2D data.  This obviously creates the opportunity for errors, in both directions I.E. Architect->Engineer and Engineer -> Architect.

If the Architect outputs an IFC file, he can then forward this to the Engineer who can then import it.  As it is a 3D file format, the engineer can then work with same virtual building that the Architect is working with.  Theoretically this will reduce the opportunity for errors quite drastically.

For more information on IFC check out some the information on Graphisofts website here

Attribute Keynotes

$
0
0

Cadimage Keynotes can be assigned to ArchiCAD Attributes, so they then get automatically assigned to any elements which use those Attributes.

Open the Keynotes Attribute manager by selecting Keynotes > Attribute Keynotes from the Cadimage menu.

Screen Shot 2013-08-23 at 5.29.06 PM

Select the Attribute Type and the attribute to attach the Keynotes to.  (In ArchiCAD 17 Keynotes can be assigned to the new Building Material Attributes, these keynotes will also be included in any Wall, Slab or Roof using a composite which includes the Building Material).

Find the Keynote(s) you want to attach and click the add button.

Attribute Keynotes can be attached to:

  • Building Materials – For Keynotes relating to the different skins of the composites
  • Composites – for the overall keynote of a Wall, Slab or Roof structure.
  • Surfaces – applied if the building material surface is overwritten.
  • Profiles – for Profiled Beams, Columns or Walls
  • Fills – for Tiled or Paved areas
  • Line Types – for Site Service Keynotes like Drainage or Water supply


Creating Tidy detail sheets

$
0
0

In the image below you can see that I have made sure that all of my joinery sections and text lines up, giving the detail sheet a  nice tidy look and feel.

sample details
There is a very simple trick that I use to get my details to look like this.  I have a Master layout for my details sheet that has been set up with a bunch of boxes that define the drawing space and the columns for my text.

2013-08-28_10-05-29
This way, When I am working on a detail, all I have to do is set the details master sheet as my Trace  and I can work within its confines.  In order to make sure my joinery sections line up, I simply draw the first detail, I.E. the head, place it on a sheet, and then set the sheet with the detail to be my trace which shows exactly where the first detail sits.


Modelling roof trusses

$
0
0

There are a number of tools available in ArchiCAD to help you model up elements like roof framing.  In this tip we will look at the Truss Maker tool

First thing we have to do is draw out the members of the truss.
The truss maker identifies different timber sizes by the pen weight used to define it.
In this example my top chord will be a 140×45 (black pen),
Bottom Chord will be 90×45 (red pen)
Struts wil be 70×45 (blue pen)

truss outline

Once we have the shape correct, select all of the components and go to:
Design>Design Extras>Truss Maker>Create Truss…

In the TrussMaker Settings dialog box we can define the type of construction and profiles for each of the colours and the 2D attributes.
Press OK and in the next dialog box give it a name.

You can create multiple trusses including saddles, truncated, etc…

I ended up modelling this house up completely with trusses and was able to insert the steel beams and find all of the clashes prior to constrcution
truss shapes

Upgrade training starts next week

$
0
0

Thats right folks! For those of you in New Zealand, we begin our nationwide tour of upgrade training starting in Wellington next week!
If you haven’t already booked a session check out the website to find out when we will be arriving in a city near you.
There are lots of cool new tricks in ArchiCAD 17 so make sure get along to one of the courses.

I will be there with Mark Horrocks as we do the North Island venues, and Mark will be joined by Jonny for the South Island venues.

If you haven’t already booked, you can book online at:

http://graphisoft.co.nz/services/training/upgradetraining  or
email Jacqui@cadimagegroup.com and she can book it for you

We’ll look forward to seeing you there

mark
Mark

tate
Tate
jonny
Jonny

Like it or not …

$
0
0

There are a large number of objects available for download on the BIM Components Portal. If you don’t believe me, try searching for WC. Over 50 library parts will show up.

LikeItOrNot01

Some of these objects may be useful. Others may be useless. It’s like a box of chocolates – you never know what you’re gonna get.

To help you, community-minded ArchiCAD users have voted for the objects they find useful. So for instance, WC Wall Mounted #1174 (at the top of the list) currently has the highest rating of all available WCs.

There’s just one catch – how do you vote for an object? Clearly this is a problem for most people, because WC Wall Mounted #1174, that most popular of WCs with hundreds downloads to its credit, has been awarded  but a single vote!

LikeItOrNot02

Here’s how it’s done.

Say I downloaded WC Wall Mounted #1174 into an ArchiCAD project. After using it successfully, I decide that I quite like to use it. In fact I find it really useful! So I want to spread the good news.

I select said WC in plan (or any other) view.

LikeItOrNot03

In the Info Box (or in the Object Settings dialog) I click on the Info (i) button, then I click on the Go to BIM Components Portal button.

LikeItOrNot03 LikeItOrNot04

A web page opens. There I see WC Wall Mounted #1174 plus a lot of information about it. I click on the Useful (like) icon.

LikeItOrNot05

We are on the move!

$
0
0

Thats right folks after 14 years in our current office, we are moving to a new location.
Third floor of the Air New Zealand building in Smales Farm.
core_home

(Those of you familiar with the area will know that it is literally on the other side of the street!)

Due to this our office will be closed today Friday the 6th of September.
We will be open for business as usual in our shiny new offices on Monday.

Our support guys will be doing most of the heavy lifting, so will not be able to answer your calls.
As always, please feel free to check out our blog or the forums on our webpage if you require guidance

How to use the Material Catalog to determine the physical properties of a Building Material.

$
0
0

When you create a new building material you can either create a completely New material.
Or you can duplicate an existing Building Material as covered in an earlier tip.

But either way in creating a Building Material you are going to want to re-define the Thermal properties of the material.

Unfortunately the physical properties of a material is difficult to get from manufacturers, as they tend to give the calculated R or U-value.

ArchiCAD does this automatically based on its physical properties:

Calculated R Value

To create a new Building Material it may be best to use the inbuilt Material Catalog in ArchiCAD:

MaterialCatalog

Click this button to bring you into the Material Catalog dialog, from there you can select from a large list the most appropriate material for your requirements:

Material Catalog


Scaleable Zone Stamps Part 1

$
0
0

We all know that the awesome folks at Graphisoft love sneaky lots of nifty tricks into their tools, But did you know about this one?
The Zone tool has the ability to display different information in its stamp depending on the scale of the drawing!


scaleble

Before we can get this to work, we need to assign the correct stamp to our zones
We can do this by going to Options>Element Attributes>Zone Categories…

zone categories


Select the correct Zone from the top of the list.  In this case 01 Residential and Recreation and assign Zone_Stamp_2 to it.


Scaleable Zone Stamps Part 2

$
0
0

We looked previously at assigning the Zone Stamp to a Zone Category.  Now we can look at how to configure the stamp to display the information we want to see.
Select your placed Zone, open the Settings tab.
Make sure the the Scale Sensitive check box is ticked.  If it is not tis won’t work
Select the Scale you want to configure. You have the options of 1:50, 1:100 or 1:200

settings


We can add and remove additional fields by clicking on the - or + buttons
We can edit a Number of different criteria such as Display Order, Identification etc…
configuration

Each of these Criteria have a number of fields available that can be configured to provide you with the ability to display what ever you need

Schedule your Roof Framing

$
0
0

If you have gone to trouble of modelling up roof framing, then it makes sense that you should be able to schedule it out as well doesn’t it?
If you haven’t read it before, I would suggest reading our tip of the Roof Framing Wizard to speed up your modelling process.

Once you have your roof completed, go to the Project Map and within Schedules>Elements select Roof Construction.
This will display a roof member list similar to this

roof members


And of course like any other list, you can click on the Scheme Settings and configure it to display whatever you need

Simple mesh creation

$
0
0

In ArchiCAD 17 you now have the ability to create a mesh by importing your surveyors data.
All you need to do is make sure that your surveyor supplies your the information in either a .TXT or .XYZ file format.

Once you have this information, simply go to Design>Place Mesh from Surveyors Data…

In the dialog box select your file and then click OK, this will bring up a second dialog box.

xyz files


In this dialog box you need to set the surveyors units, placement method and how far above sea level the mesh should sit.  Once done hit OK

Then all you need to do is place your mesh!

The easiest way to check/modify a composite in V17

$
0
0

One of the most useful features in V17 which I find myself constantly using is the new option in the right click menu.

If you select any composite wall/slab/roof/shell in any view and right click you will not see this:

Rightclickmenu


This means you can go to any composite without having to go through the Options>Elements Attributes menu

It will also have the composite you are using selected with all information on the screen:

Compositestructure

Element Keynotes

$
0
0

Adding Element Keynote Labels is even easier in ArchiCAD 17 with the updated format of the keynotes palette.

Element Keynotes

1. Select Element Keynote Label mode.

2. Select the Element Label type:

  • Single Keynote – only one keynote per label
  • Single Category – all of the keynotes for a category will be included, also additional keynotes added to that category will automatically be added to the category label also.
  • All Keynotes – all keynotes assigned to the element will be included in the label, any additional keynotes added to the element will automatically be added to the label also.

3. Select the elements you want to add keynotes to.

4. Double click on the Keynote you want to add (this keynote will be added to all selected elements).

In addition to this the default label will be set up ready to be placed beside the first selected element.

 5. Or you can add Keynote Labels to all of the selected elements by clicking the Add Element Labels button.

Depending on the Element Keynote Label Type one or more Keynote labels will be attached to each selected element:

  • Single Keynote – One Keynote Label will be added for each keynote
  • Category Keynote – One Keynote Label will be added for each Category
  • All Keynotes – Only one Keynote Label will be added to each element containing all of the Keynotes
Viewing all 1008 articles
Browse latest View live